I really wish i could understand this having tried all the steps im no closer to having a working battery indicator
Can you share your face that you’re working on and maybe we can help you better.
ive shared it on facer but i just want a battery symbol or dial that moves as the battery drains , having tried every step outlined above im still no closer to achieving it
Hi, I have maybe stupid question. But how do I tell the Facer Creator I want to create circle power indicator? I can only choose digits in the Information Elements. Or do I upload my own hand and give it (somehow) the function of battery indicator?
And also, where do I set the rotation and its borders?
Or do I simply need to be PRO member to have these functions enabled? 
Once again, I’m very sorry, if I placed wrong question, but I’m total newbie in here and this is the best topic I found
Thanks for your help!
There’s no stupid questions
For a circle power indicator, currently you have to create one, it’s not a built in function.
You don’t need to be a pro member to enable anything.
Here’s a good tutorial on how to do it:
Visualizing the method:

EDIT:
Or do you mean you want a large sphere to shrink over time to indicate how much battery power is left?
4 Likes
Oh, many thanks for your advice! I actully will use those tutorials in future watchfaces, so thank you for that
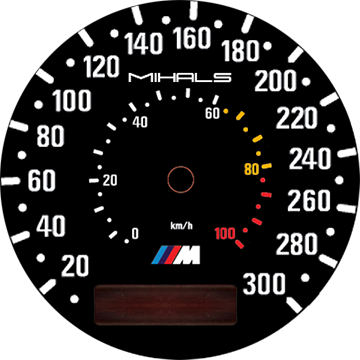
What I have in mind is a speedometer-like battery indicator. A needle that shows current battery percentage, see this watchface with the smaller circle 0-100, which should represent the percentage stats.
1 Like
Sounds great! There’s lots of tutorials out there for it… I think searching “gauge” or “fuel” can help. TOMAJA has some great tutorials!
I used one of them to make a fuel/battery gauge. I have inspection mode turned on if you want to see:
You need to know the starting angle, and the ending angle - typically for a speedometer style gauge (like the one you show), it will be either -120 or +240 degrees. Then measure how far you want the needle to rotate (Say 240 degrees - so that it will rotate from -120 degrees to +120 degrees from vertical).
Take that, and then use the expression builder with the battery PERCENT (I don’t use the integer) - and don’t forget your parenthesis around the formula:
(-120+((#BLP#/100)*240))
That basically means:
([THE START ANGLE]+([Batt % / 100]) * [The total angle you want the needle to move])
This will move the needle from LEFT (full) to RIGHT (Empty). - To reverse the direction, just invert the whole formula:
(120-((#BLP#/100)*240))
Hope this helps!
3 Likes
Wow, that really helps a lot! Thanks for being so patient with me, complete novice!!!
Now I know NEARLY everything I need.
Last thing I don’t understand is WHERE I enter all these codes? It’s not in the Facer editor, is it? 
Also, if I click the “option icon” next to your watch, I don’t get the “inspection mode”, only “Report” 
Yep, in the editor/creator.
As far as inspection mode goes, you have to click on the name of the watch, if you see a little rocketship on the left, inspect mode is available. Alternately, you can just add /inspect to the url of a watch.
INSPECT MODE:
Thanks again dear sir! I do appreciate your kindness, tomorrow I will check it out! Finally I can work on some more complicated faces
Have a great one @cth4242
Firstly let me say thank you. This is a very easy to understand tutorial. I have a question about the battery dial version.
I have done everything that you have suggested but have noticed an anomaly. When testing the indicator with time lapse, at 4 mins to midnight, the dial hand returns to the upright 12 position rather than remaining at empty and then going straight to full.
To explain it using your pictures, the hand is placed in the dial at the 12 o’clock position. The ±150 work perfectly, but at the 4 minutes to midnight the dial goes from empty to 12 o’clock position and sits there until midnight and then moves to the full position. Have I done something wrong?
Thanks in advance.
well i have read these tutorial 1000s of times and they make less and less sense to me, sorry but making a dial for battery life is not as easy as this tutorial makes out and ive tried every day for months
Hi @jase_nunn, thanks for your feedback. I was just comparing this tutorial with some of my other like
or
In this comparison, maybe you agree too, that this one is very simple.
No I cant agree on any of these being simple, you base the tutorial on the fact that some people have previous knowledge of the coding etc ,some maybe most do not have previous knowledge and as such are beginners , maybe a beginners guide would be more suitable with step by step instructions , the whole of facer can be quite confusing to a beginner things such as #BLN# maybe simple to those that know but a beginner will have no idea what it means or what its for
I cant even get the pointer to align correctly with full empty or 50 % when trying to create a battery dial, ll this before i even attempt to get the dial itself working
Yes that is super simple and whilst I appreciate your efforts you are Somewhat missing the point, I can create a face without any trouble at all however what I want but can’t add are battery dials amongst other things so a Basic more simple tutorial on dials would be appreciated, the one u have is complicated in my opinion when I follow all the steps u list I still have issues hopefully u saw my picture
such a lack of help on this forum , a so called community its actually shocking
Hi @jase_nunn
I have a battery dial in my watch face here:
Inspection mode should be enabled (let me know if not)
If you select the battery dial hand and look at the “rotation” settings you should see how to use.
(-90+(#BLN#*1.8))
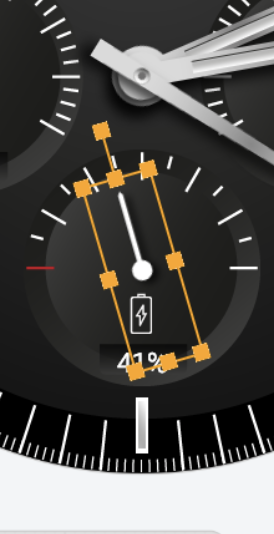
- When you initially import your dial-hand image it should be set to the 12:00 position.
- The red tick marker (0% battery) is -90 degrees from the 12:00 position and so this becomes its starting poistion.
- The hand has to rotate 180 degrees from the red marker (0%) to the opposite white marker (100% battery) so we multiply the Battery Level Number (BLN) by 1.8 (180degrees/100 percent).
I hope this makes sense!
2 Likes