En français :
Bonjour la communauté 
Je suis nouvelle dans la création de cadran et je me demande comment faire pour mettre une image différentes sur le mode repos?
J’arrive à mettre en mode actif mais quand je tente une image en mode repos ça enlève et remplace sur les 2 mode…
Quelqu’un pourrait m’aider à résoudre ce petit soucis? 
En anglais : 
Hello community
I’m new to dial design and wondering how to put a different image on idle mode?
I manage to put in active mode but when I try an image in rest mode it removes and replaces on the 2 modes…
Could someone help me solve this little problem?
1 Like
Welcome to the Community .
You are in the right place to get answers to your Question .
I do not use DIM / AOD mode . My watch has two Classic and Dimmed . My watch is Samsung Galaxy Active .
Check your watch has only one otherwise check the two .
Put your AOD image in an Image layer . The Creator Background Layer might have its own rules .
I am trying to do a test but I struggle these days to Sync tests for my Laptop . Shame .
Remember the Standby / AOD / Dim mode is supposed to be low power consumption . so you will not run a Sequence there .
Google Translates
Bienvenue dans la Communauté.
Vous êtes au bon endroit pour obtenir des réponses à votre question.
Je n’utilise pas le mode DIM/AOD. Ma montre a deux Classic et Dimmed. Ma montre est Samsung Galaxy Active.
Vérifiez que votre montre n’en possède qu’un sinon vérifiez les deux.
Placez votre image AOD dans un calque Image. Le calque d’arrière-plan du créateur peut avoir ses propres règles.
J’essaie de faire un test mais j’ai du mal ces jours-ci à synchroniser les tests pour mon ordinateur portable. Honte .
N’oubliez pas que le mode Standby/AOD/Dim est censé consommer peu d’énergie. vous n’y exécuterez donc pas de séquence.
This works for me in AOD / Classic mode . Nothing in Dimmed mode . But that is just the Active . Other watches will be different .
See the two layers are for Images and the AOD one is as high a contrast as possible .
Click on the Title of the face then the Little Rocket on the Left you will then be Inspecting the Test . Not much there but you will have some practice Inspecting Others Work .
Google Translates .
Cela fonctionne pour moi en mode AOD / Classic. Rien en mode Gradé . Mais ce n’est que l’Active. D’autres montres seront différentes.
Voir les deux couches sont pour les images et celle AOD est aussi contrastée que possible.
Cliquez sur le titre du visage puis sur la petite fusée à gauche, vous serez alors en train d’inspecter le test. Pas grand-chose là-bas, mais vous aurez un peu de pratique Inspecter le travail des autres.
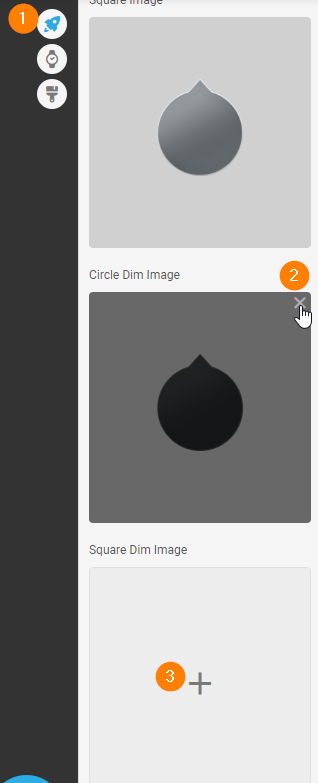
For the image element, you have to scroll down in the Layer Properties, remove the 2 dim images and then you can add new ones:
3 Likes
At last someone who knows what they are talking about :::)))
1 Like
I found that testing both has the same result for me . I always put AOD on my Faces but don’t use it on my watch .
the easiest way you have to do the DIM mode, is to place a black image with a percentage of transparency that you like so that it darkens all the other layers that you already created in a normal way, then you activate the same layers that you have in the active mode, and when you have a black layer with transparency on top, they will look darker… for what you want to see, you place it on top of the black layer, it does not have to be the same layer, you can duplicate the layer that you want to make it look brighter and take it all the way up by leaving it off in active mode and only on in AOD mode
2 Likes
Merci j’ai réussi à faire un essai depuis mon tél je tenterai depuis le pc
Bonne journée à tous
1 Like