[Tutorial] Animated Digital Time Fonts
There are several ways to display animated fonts to represent digital time in Facer, but you have to be creative. I’ll go through a few ways that I have done it in some of my watch faces, and hopefully if others have ways they can add to this living document thread.
Sequential Frame Substitution Animated Font
This method utilizes the Sequence element in Creator. We will set up a digital clock to make one sequence per each digit of time you wish to represent. In a digital clock, you will have both the Hours and minutes represented by Tens and Ones digits. That is what I’ll work with in the example.
You will need to decide whether your motion font will be looped for continual movement, or transitional movement. The animation result is quite different. For example:
A looped continual movement animated font example is in my Blue Flame watch face. (Fair warning, the previews take a while to fully load in a browser, and may not be fully loaded even though they look like it. There are lots of elements to load. They work fine on the watch and in the Facer App preview, but they do still take a while)
A transitional movement animated font example is in my Tetris Falling Time watch face. Turn on/off the black & white mode (little round icon with dots around it) to reset the transition in the preview. Each reset is equivalent to the wrist motion to turn on the screen for say a 3 second screen on time.
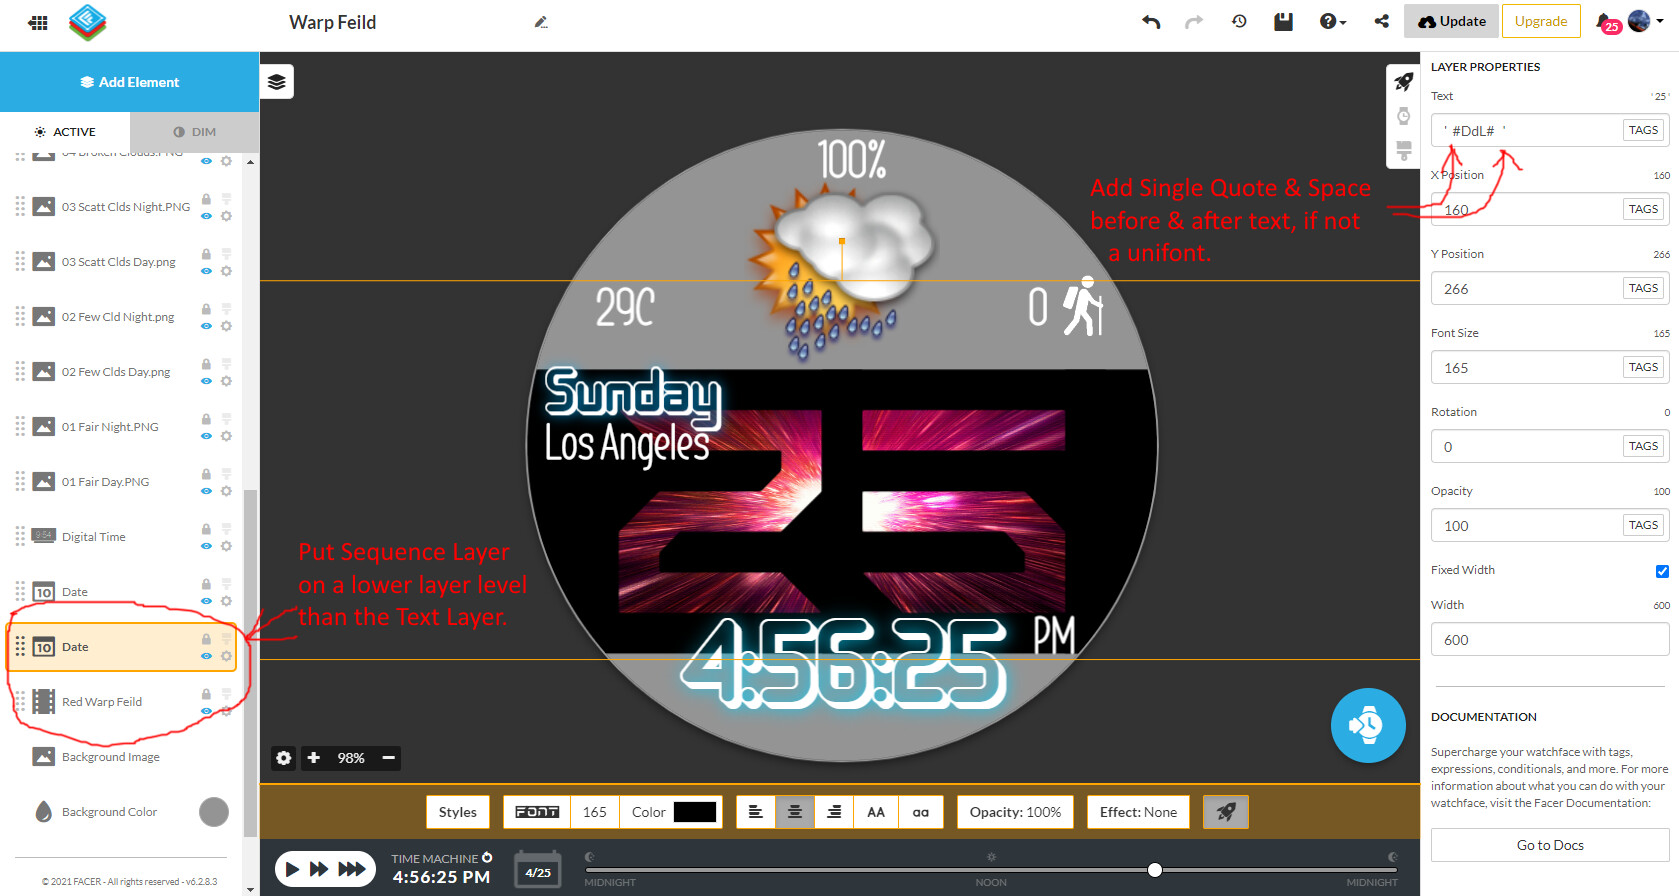
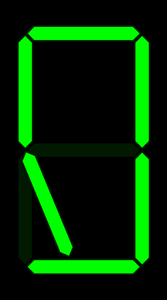
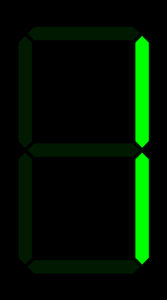
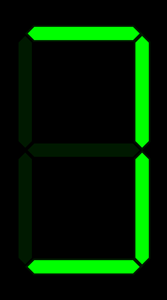
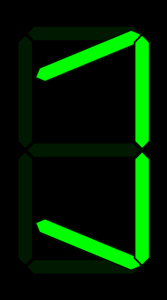
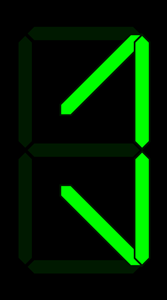
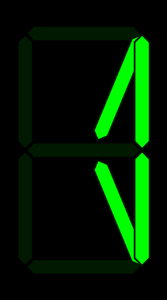
- The first step is to build your Font into individual frames of PNG format images for the numbers 0 through 9. This is the hardest & most time consuming part, but also the most fun and creative part. It is important to limit the number of frames to 24, as this is the limit of the Sequence element in the Facer Creator web app. In Blue Flame, I only used 4 frames for each digit to try to ease the processor load, but in Tetris Falling Time, I used all 24 frames, and it still works rather well. In this example, we will do a transitional animated font and call it LED. For the number 0, the animation transitions from 9 to 0 over 4 frames:
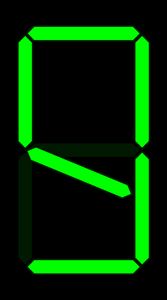
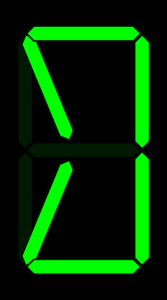
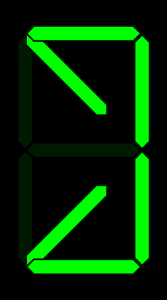
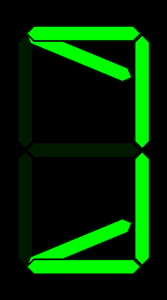
For the number 1, the animation transitions from 0 to 1 over 8 frames. Note that it does not start at 0, but after 0, as 0 is already displayed when the transition starts. :

If you decide to use a looping animation, you can start to create the font online with any number of animated font web apps such as Animate Your Text into GIF / SVG / APNG · loading.io, and download the animated GIF. I used a similar web tool for the fonts in my Blue Flame watchface. Depending upon your tools you use to generate the frames, you may need to convert each of the frames for each number from an animated GIF file to a PNG, make transparencies, etc.
To convert a youtube video to animated GIF, there are many online tools such as GIF Maker - Imgflip
To convert an animated GIF to individual frames, there are also many online tools such as Split GIF image in frames
To batch convert, batch rename, batch crop, batch resize individual GIF’s to PNG’s, try the free Ifranview software at https://www.irfanview.com/
To make transparent parts to your PNG’s use the magic select tool in paint.net software, then delete. Or some of you guys who are more graphically skilled may have similar and better tools in photoshop or whatever you use.
-
Ok, so you have all your digits from 0 to 9 - great. Make it easy on yourself and name and place each digit in it’s own directory and label them easily. For instance, in this sample font called LED, you create a main font directory called LED. Then create a subdirectory called 0. A subdirectory called 1, etc all the way to a subdirectory called 9. In each subdirectory label each image frame accordingly, such a in the “1” directory you have 1_0.png, 1_1.png, 1_2.png & 1_3.png. Continue naming all the images in all the directories in a similar fashion.
-
You are now ready to import things into Facer. In Creator you will “Add Element”>”Sequence” and your controls will be similar to the following image, without the images populated as they are below.
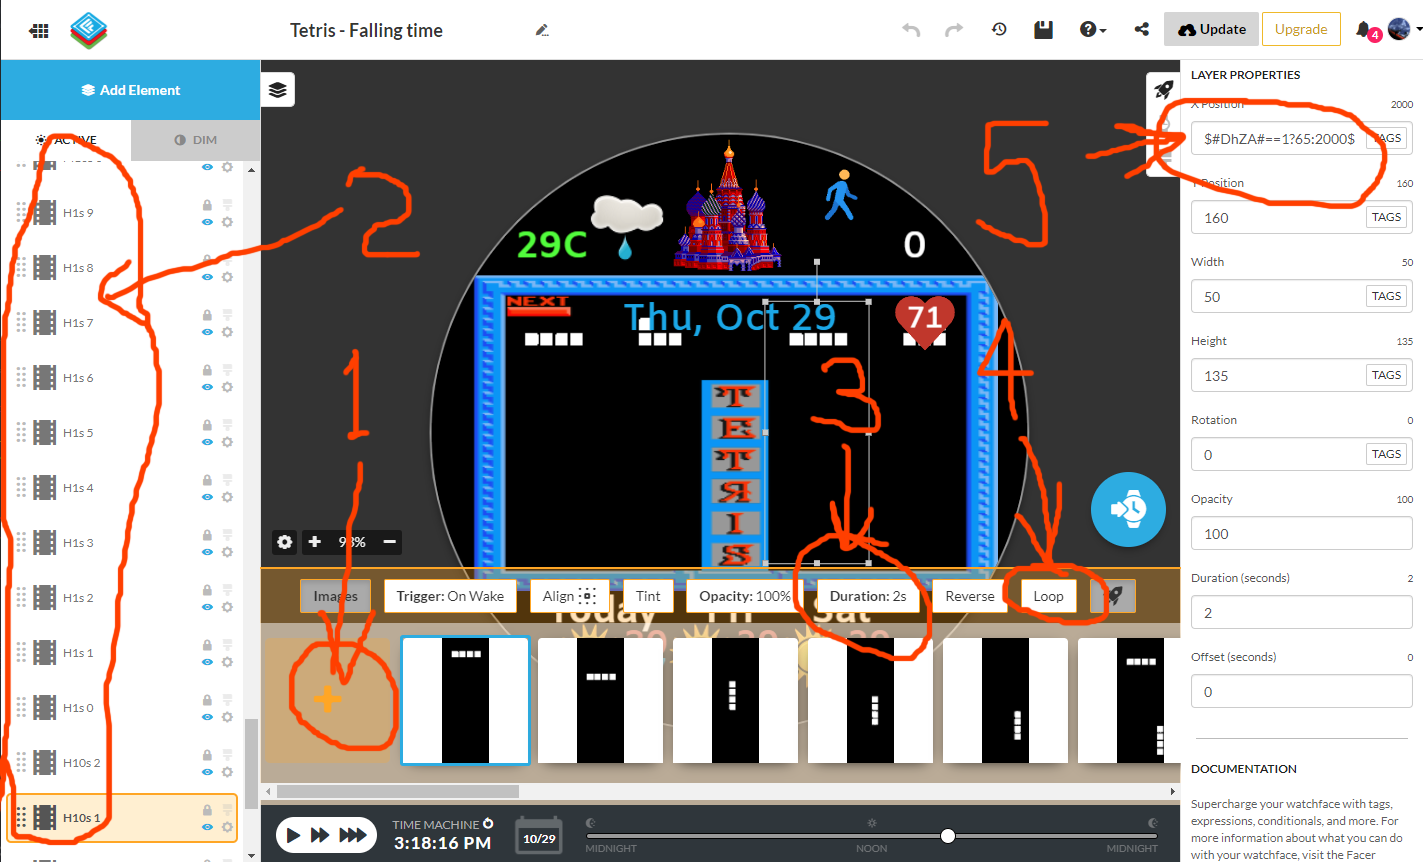
Click on the “Images” button (1), and then the “+” button. You will start by entering the animation for the number “0”. Go to your “0” directory you made in step 2 above and enter in all the images in the correct order. You can batch import.
Rename your element by clicking on the gear in the element list on the left side (2) to say “H10s 0”. This stands for Hour, tens digits, number 0. Ultimately you will end up with sequence elements labelled in a similar format for each of the Hours, tens digits numbers 0 &1, Hours ones digits for numbers 0 to 9, Minutes tens digits for numbers 0 to 5, and for Minutes ones digits for numbers 0 to 9. Yes, that is a lot of sequence elements, with allot of frames. See in the photo above for section (1). I hope you have a PC with lots of fast memory, or your browser may get bogged down and slow. Once the sequence frames are entered, then you set the sequence duration (3) from 0 to 3 seconds, and whether your animated font is a transitional animation (not looping) or a continual (looping) sequence (4).
- Now once all the sequence elements are in, move their X & Y coordinates around until you are happy with their locations. Don’t worry about overlapping at this point, just get them located. Once they are at the location you want, we need to turn them on or off depending upon the time, so only the proper digits of time are on at the appropriate moment. This naturally suggests we use transparency and an IF/THEN statement, but transparency isn’t an option for sequence elements. So we use coordinate substitution in an IF/THEN statement.
For the Hours tens digit, in the X coordinate for the “H10s 0” sequence we use the equation:
$#DhZA#==0?65:2000$
Where this checks if the 10s digit of the hour is 0. If it is, the X coordinate shall be 65 in this case. Otherwise, shift it off screen at X coordinate 2000. Similarly the equation for the “H10s 1” sequence is:
$#DhZA#==1?65:2000$
This was easy, there are only 2 possible digits in the Hours 10s digits. Now for the Hours Ones digits where we must enter an equation for the X coordinate for digits 0 through 9.
$#DhZB#==0?118:2000$
for “H1s 0” where if the hour ones digit is 0, then set the X coordinate to 118. Otherwise shift it off screen at X coordinate 2000. Go through similarly for digits 0 to 9.
For the Minutes 10s digits, there is no exact tag, but we can use a little math to get it in the equation for the check for the 0 digit with:
$(floor(#DmZ#/10))==0?207:2000$
Where in this case if the “M10s 0” sequence number element is “0” the X coordinate shall be 207, otherwise shift it off screen out of view at coordinate 2000. Do this for all Minutes tens sequences 0 to 5.
Similarly for the Minutes ones digit has no tag in Facer and therefore the check needs some math with the equation:
$(#DmZ#-(10*(floor(#DmZ#/10))))==7?260:2000$
Where in this case if the “M1s 7” sequence number element is “7” the X coordinate shall be 260, otherwise shift it off screen out of view at coordinate 2000. Do this for all Minutes One’s sequences 0 to 9.
Now your clock with animated fonts should be working! 
3D effect Animated Font
Another fun way to animate the font is through the accelerometer in a 3d Effect. This effect does not show up well on a Facer Preview on a PC, but it does work in a Facer Preview on a phone or of course on the watch (at least on my Samsung). An example of this effect is in the Gyro -Abyss:
To achieve this effect is fairly simple. You need to create multiple layers of a “digital time” element in Creator at the same location. About 3 layers should be fine, but you can do more or less. Then you simply add in an accelerometer type of equation into the X and Y coordinate box. I have used:
(160-((accelerometerRawX())*z))
And
(160-((accelerometerRawY())*z))
Where you either increase or decrease the value of z depending upon whether you are using an upper or lower layer. Numbers between say 3 to 15 work reasonably well. Others may be fine too.
For more information on the accelerometer i recommend @Tomaja’s great tutorial here:
You can also use the X and Y coordinate to simulate a dropping font, as in this example of the seconds:
Where we can simply adjust the size of the font. In this case we use the tags for seconds with 2 decimal places less the tag for seconds without decimal places to get a decimal value for each second passing, then drop the size by a certain rate. The equation for the font size is then:
(z-r*(#Dsm#-#Ds#))
Where z = the initial size of the font and r = the rate of reduction multiplied by how far you are into each second.
Movement Animated Fonts
This is perhaps the simplest way to animate a font in Facer. I typically don’t use it however as when I look at the time, I want to know where it is at a glance, not waste time looking where it might be. This type of animation is achieved by inserting an equation into either the X coordinate, Y coordinate or the Rotation value boxes. I won’t get into it here too much, but one neat way is that you can use sinusoidal motion as outlined in another of @Tomaja’s tutorials here: